I've been referencing the term "n-plied" with some of my yarn descriptions, and I thought I had better define what I mean.
N-plied: A shorthand term for navajo-plying, sometimes referred to as chain-plying. This plying technique takes a single strand of yarn and loops it back on itself before allowing plying twist to enter the chained section in order to create a 3-ply yarn . If you are familiar with crochet, the loops of yarn are very similar to creating a chain in crochet. Technically, this type of yarn is a not a true 3-ply yarn and does not have the same strength as a true 3-ply, but it otherwise behaves very similiarly. This technique is commonly used to maintain color repeats in a singles yarn. I use it for that purpose, and also for the times when I feel too lazy to rewind a singles yarn on to multiple bobbins for traditional plying.
If you're interested in learning more about navajo plying, I think the Yarn Wench's tutorial is one of the best explanations with both video & written instruction with photos. Also, the Yarn Harlot has a blog post from a few years ago that I think is a great summary of the pros & cons of n-plying.
Wednesday, February 29, 2012
Tuesday, February 28, 2012
An experiment
One of the dogs decided a braided piece of wool/silk was irresistible and chewed it to pieces. (Note: dogs might have a future as felt manufacturers...) I salvaged what I could of the fiber and spun two kinds of singles. One of the larger pieces became very, very thin yarn spun on my lightest spindle, and the other pieces became a much thicker, lower twist single spun on my wheel:


I decided to play with different plying techniques on my wheel and I've come up with a few small lengths of different yarns. The important lesson for me with this experiment was humility. I have enjoyed a string of successes (ha! pun partially intended) with my spinning in the last month and I was apparently feeling too confident. The spinning gods decided I needed to struggle with my wheel in order to restore a bit of proper meekness in my craft life.
I swear, I could not find the sweet spot of tension settings with this experiment. I had treadling problems, draw-in problems, whistling wheel bands, yarn catching on hooks, you name it, I experienced it. I would solve one problem for another to crop up.
So after some cursing and struggle, I came up with two yarns: (1) a bit of artsy flame yarn, where I plied the thicker single in a wrapping motion around the thin single, and (2) a bit of n-plied thick single for a small amount of 3-ply yarn. The third yarn in the picture is the ball of remaining thick single after playing with my plying. I decided this was plenty of experimenting. I have enough yarn to make a really fancy, highly textured coaster and I've decided to stick with that result. I bow my head in respect to the spinning gods and will hope to have a less frustrating experience with my next yarn.

Monday, February 27, 2012
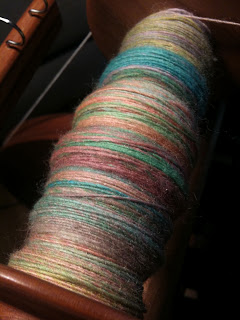
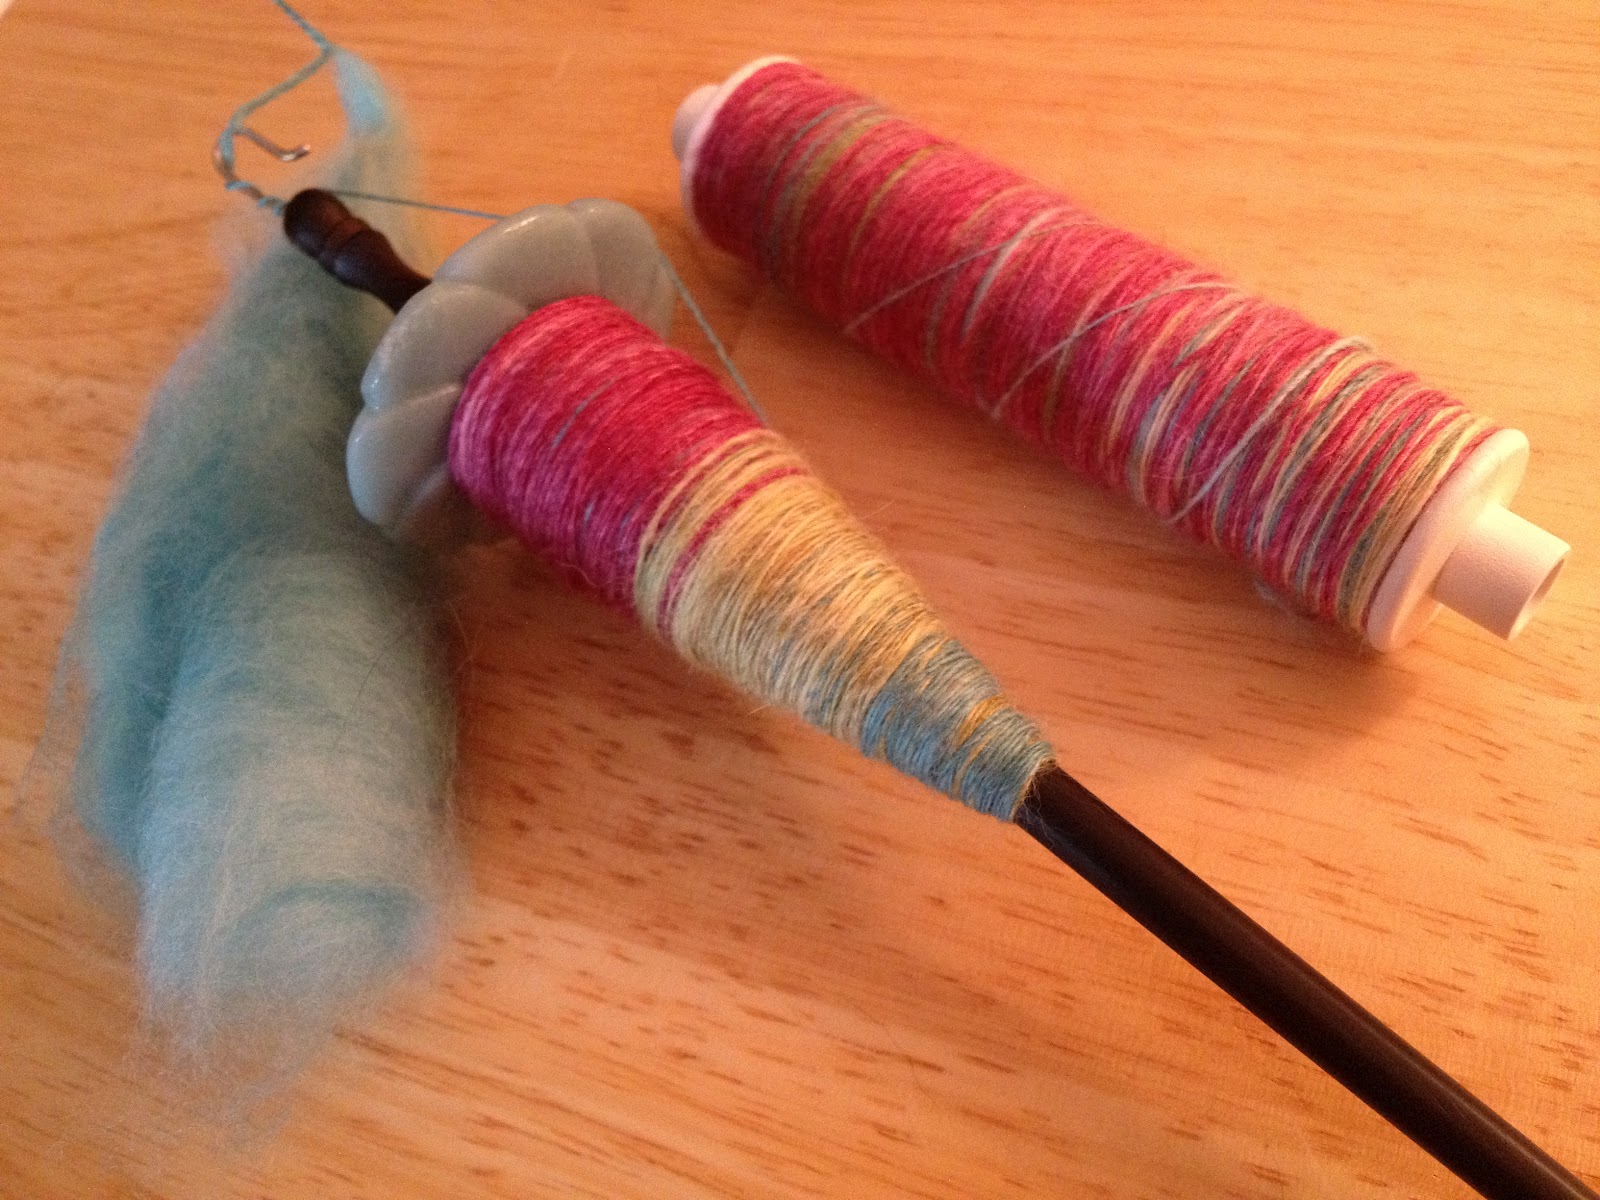
Can you say active plying twist?
As I had planned for my weekend spinning work, I finished plying my Indiana Dunes yarn. I filled most of a bobbin with the 2-ply yarn:

I use my swift to pull the yarn off the bobbin into a skein. While it's stretched on the swift, I can easily tie off the skein to prepare it for the last step, which is washing it & setting the twist. Since the twist energy in the singles has long been dormant, the plying twist accounts for all the active energy in this yarn, which can lead to very funny-looking yarn.
When I took the skein off the swift, the yarn formed its own 3D art object:

And it was tempting to just leave it alone and let it be a pretty, artsy cowl:

But I decided to go ahead and wash it. It's soaking now in hot water. I'll press out that water, then soak it again in hot water with a bit of soap, rinse it in cold, rinse it in hot with a bit of agitation, one last cold rinse, press out the last water & hang it to dry.
Friday, February 24, 2012
Working away on those spinning WIPs
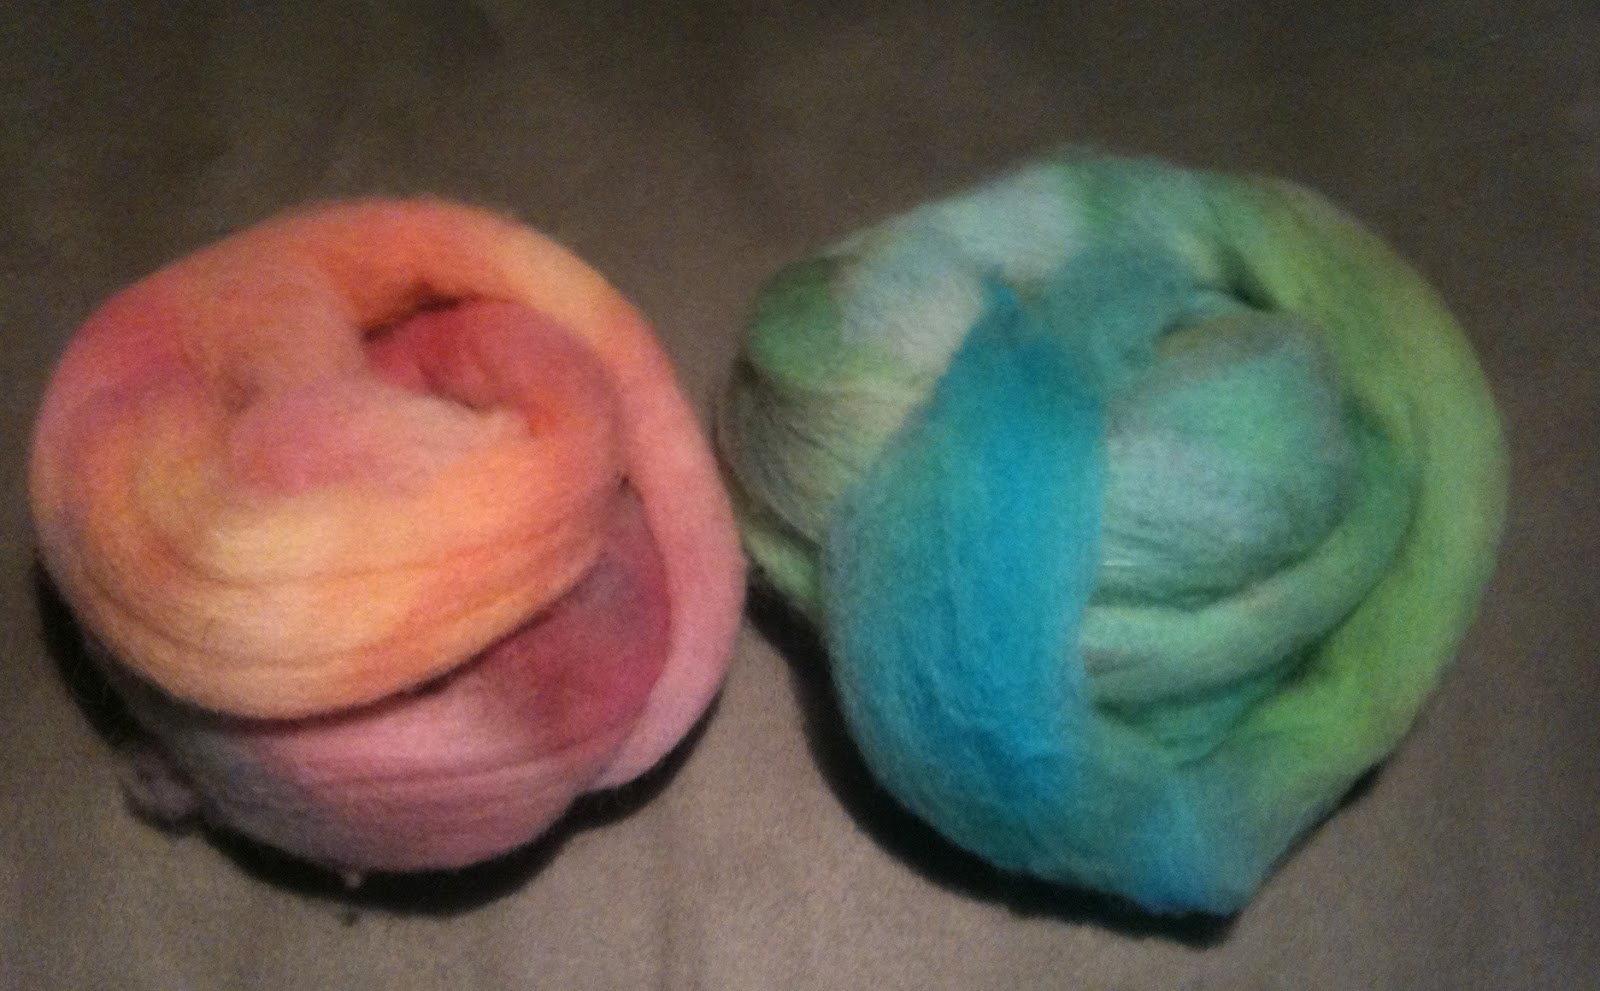
I'm down to finishing my last old spinning WIP! Here is a snapshot of the current plying process:


Pretty, eh? I am really enjoying the plying of these two singles and seeing how the bands of colors are matching up. The plan is to finish this yarn over the weekend, which should be a very satisfying task.
Thursday, February 23, 2012
English Garden sample yarn is finished!
I have finished my "English Garden" sample yarn! Another WIP to cross off my list! A while ago, I had admired a big box of the "English Garden" colorway at Detta's, and she was very kind to give me a sample of the fiber. I used my smallest spindle, weighing 16 grams, to spin a sample yarn. And I decided to have some fun and make the sample into a 4-strand cable yarn.
Here's a recap of this yarn from start to finish:
I took my sample of Ashland Bay merino "English Garden" colorway,

and divided the wool into four strips of approximately equal size. I spun the wool using a worsted drafting method. I would spin one of the strips, then spin a bit of white wool to mark the end of that strip and the beginning of the next one.
I wound off the singles yarn containing two strips worth of the fiber on to a bobbin, and then repeated the process to fill the other bobbin:


Once I reached the white middle area, I wound off the first section of 2-ply yarn on to a bobbin, then repeated the process to fill another bobbin.


Here's a recap of this yarn from start to finish:
I took my sample of Ashland Bay merino "English Garden" colorway,
and divided the wool into four strips of approximately equal size. I spun the wool using a worsted drafting method. I would spin one of the strips, then spin a bit of white wool to mark the end of that strip and the beginning of the next one.
I wound off the singles yarn containing two strips worth of the fiber on to a bobbin, and then repeated the process to fill the other bobbin:

I plied the bobbins together to form a 2-ply yarn, and was very happy to see that my white middle areas lined up very well.

Once I reached the white middle area, I wound off the first section of 2-ply yarn on to a bobbin, then repeated the process to fill another bobbin.
Finally, to create the final 4-strand cable yarn, I plied the two 2-ply yarns together. I used the same spindle for this entire process. The final yarn is very strong and has a nice bounce to it. Even though it's a 4-strand yarn, my initial singles were quite thin, so the final yarn is still laceweight! It's a very sweet, small skein of yarn that was a lot of fun to make.
100% merino wool
4-strand cable, worsted
8 grams, 27 WPI (laceweight), 36 yards


Wednesday, February 22, 2012
Wooly Word of the Week: Stash
For the past several days, I've been talking about my stash and how I need to get it inventoried and under control. So it seemed prudent to add the term to my glossary:
Stash: A collection of fibers in any form that go beyond the needs of a single project. If you buy just enough yarn or fiber for one project at a time, then you don't have a stash. I would even say that if you could use up all of your yarn & fiber within six months, then you don't have a stash. If you have enough yarn or fiber to last until the zombie apocalypse, then you have a stash. If the mass of your stored fiber outweighs you, then you have a stash. If you've considered who should inherit your fiber after you die, then you have a stash.
Stash: A collection of fibers in any form that go beyond the needs of a single project. If you buy just enough yarn or fiber for one project at a time, then you don't have a stash. I would even say that if you could use up all of your yarn & fiber within six months, then you don't have a stash. If you have enough yarn or fiber to last until the zombie apocalypse, then you have a stash. If the mass of your stored fiber outweighs you, then you have a stash. If you've considered who should inherit your fiber after you die, then you have a stash.
Tuesday, February 21, 2012
Updating yet more stash
For the past few days, I worked to finish taking pictures of all of my unspun fiber, so that I could have a complete inventory of this portion (ha! not even going to think right now about the fleeces and yarn) of my stash. I alternate between glee and mortification that I've accumulated so much fiber since I began spinning. It's kind of like dancing a jig while hiding under a bed. Weird psychology.
On Friday last week, I posted that I had photographed and cataloged all of my dyed fiber. So it was time to get to work on my natural, undyed fibers. I have a really diverse collection that includes different sheep wools, mohair, silk, and luxuries like angora and mink. I love having those bits of luxury fibers to admire and pet, but I haven't yet given myself permission to use them. I'm still quite firmly in the reverence stage for these fibers. Until I know that I can do them justice with my spinning skills, they'll remain unspun and serve as inspiration & motivation to keep improving my technique.
But the important news, the milestone achieved, is that I have a complete catalog of my unspun fiber stash! I have photos and details of all of my fibers logged into my Ravelry stash. I debated using a different stash tool, either creating my own or there are even apps available for it on my iPhone. But in the end I decided that would be kinda like reinventing the wheel and I didn't need to add a layer of work on to this inventory project.
So what does this mean? It means for the first time, I actually know exactly what I have in my unspun fiber stash, including what it is, how much there is, and with a photo for every item. I will now be able to browse through my catalog and easily pick out my fibers for a project. This is awesome!
Here are a few of the natural, undyed fibers that I found during this inventory work:
Pearl mohair locks:

Mixed grey & brown Lincoln lamb locks:

plucked English angora:

baby alpaca combed top:

Monday, February 20, 2012
Adding a new page to the blog
I've added a new page to the right sidebar of this blog entitled "Fiber craft personal goals." I don't want to over think this list, and I'm not interested in creating some kind of production metrics to follow any so-called progress with it. This is not meant to formalize my exploration of this craft. But I needed a place to list all of the ideas that occur to me. I see something beautiful or read about a technique that's new to me, and I think "I want to try that!" And because thoughts occur & leave me so quickly, I thought I had better have a place to write down all of these ideas before I lose them.
Friday, February 17, 2012
Updating my stash
I took some time yesterday to work on cataloging my stash inventory. As I mentioned in Tuesday's post, which is a bit embarrassing, I honestly do not know what is in my stash. So I pulled out the plastic crate that stores my dyed unspun fiber and began taking pictures. Now I'm dancing the victory dance, because I did get through my entire dyed fiber stash! There's still plenty of undyed fiber, fleeces, and yarn to catalog for a complete stash inventory, but the first step of the catalog process is complete and it feel really, really good.
I use Ravelry's stash organization tool, which isn't available to the general public so I can't post a link that will work for everyone. If you are a Ravelry member and want to see the full dyed fiber inventory, my ravatar is zeithound, and then click on my handspun stash. Since the organization tool forces the list to be alphabetical, I came up with a naming convention that forces my handspun into subcategories that make sense to me. My subcategories are Fleece, UF (stands for unspun fiber), WIP, and Yarn. This means my list automatically moves from (1) stuff to spin, (2) stuff being spun, and (3) finishing spinning.
I can't post without a few pretty pictures, so here are some of the dyed fibers that are now officially recorded in my stash inventory. All of the beautiful colors make my fingers itch to start spinning!


Thursday, February 16, 2012
Checking the Easter 2011 WIP off the list
Last Easter, I decided that instead of dumping our egg dye down the sink, I would use it to dye wool and see what would happen. I had some very inexpensive domestic wool top that I could use for the experiment, so that if it went badly, tossing out the wool wouldn't give me a guilt trip over frugality.

I pulled off an arm's length of wool, divided it in half and set the pieces to soak for about a half hour in warm water:

I drained the water and gently pressed out any excess water from the wool. Then I put each piece of the damp wool into a gallon-sized ziploc bag. I drizzled dye colors randomly over each piece of wool. I had six colors of dye, so I used the warm colors (red, pink, yellow) on the fiber in one bag, and the cool colors (green, blue, purple) on the other. Here is one of the bags with pink drizzed over the fiber:

I heat set the dye using the microwave. I put a microwave safe small glass bowl with water in the microwave and laid one of the bags flat, leaving the zipper edge of the bag open. I ran the microwave for 3 to 5 minutes on half power, then checked to see if the dye had exhausted by touching the hot fiber with a piece of paper towel. I repeated the heating until the paper towel didn't have any color on it:


The second bag of fiber received the same heat-setting treatment. Next, I rinsed the wool in very hot water. I ran the hottest water from the tap into a large bowl, then gently slid the hot pieces of dyed fiber into the water. I let them sit there until they were cool enough for me to handle with my fingers. I drained the first rinse water and rinsed them again in the same way using warm water (matching the water temperature from the tap to how warm the fiber felt on my hand).

Finally, I drained the last rinse water and let the pieces dry on one of my stackable sweater dryer racks. The pieces of dyed wool were great! I loved the variegated colors and there was no felting or matting of the fiber:

For spinning them, I stripped each top into four pieces and use one of each dye lot together to form four little nests for my spinning:

I spun a single using my wheel and a semiwoolen drafting style, filling one bobbin:
After letting the singles harden on the bobbin overnight, I n-plied them to create the final skein of 3-ply yarn. The final yarn is very lofty and bouncy. And now I have finally calculated the stats on this skein, so the Easter 2011 yarn is no longer a spinning WIP!
100% wool
3-ply semiwoolen
1.6 ounces, 11 - 12 WPI (worsted to aran weight), 86 yards


I pulled off an arm's length of wool, divided it in half and set the pieces to soak for about a half hour in warm water:

I drained the water and gently pressed out any excess water from the wool. Then I put each piece of the damp wool into a gallon-sized ziploc bag. I drizzled dye colors randomly over each piece of wool. I had six colors of dye, so I used the warm colors (red, pink, yellow) on the fiber in one bag, and the cool colors (green, blue, purple) on the other. Here is one of the bags with pink drizzed over the fiber:

I heat set the dye using the microwave. I put a microwave safe small glass bowl with water in the microwave and laid one of the bags flat, leaving the zipper edge of the bag open. I ran the microwave for 3 to 5 minutes on half power, then checked to see if the dye had exhausted by touching the hot fiber with a piece of paper towel. I repeated the heating until the paper towel didn't have any color on it:


The second bag of fiber received the same heat-setting treatment. Next, I rinsed the wool in very hot water. I ran the hottest water from the tap into a large bowl, then gently slid the hot pieces of dyed fiber into the water. I let them sit there until they were cool enough for me to handle with my fingers. I drained the first rinse water and rinsed them again in the same way using warm water (matching the water temperature from the tap to how warm the fiber felt on my hand).

Finally, I drained the last rinse water and let the pieces dry on one of my stackable sweater dryer racks. The pieces of dyed wool were great! I loved the variegated colors and there was no felting or matting of the fiber:
For spinning them, I stripped each top into four pieces and use one of each dye lot together to form four little nests for my spinning:

I spun a single using my wheel and a semiwoolen drafting style, filling one bobbin:

After letting the singles harden on the bobbin overnight, I n-plied them to create the final skein of 3-ply yarn. The final yarn is very lofty and bouncy. And now I have finally calculated the stats on this skein, so the Easter 2011 yarn is no longer a spinning WIP!
100% wool
3-ply semiwoolen
1.6 ounces, 11 - 12 WPI (worsted to aran weight), 86 yards

Wednesday, February 15, 2012
Wooly Words of the Week: Grist, WPI and niddy-noddy
As part of this blog's resurrection, I am reinstating Wednesday's posting tradition of a Wooly Word of the Week. Each Wednesday I will post a definition of a word (or words) that applies to fiber crafting in some way. The following week, that word(s) will be moved to the glossary page of the blog and the new word(s) will be posted.
Since yesterday's post mentioned how calculating the statistics of a finished skein of handspun yarn is important to me, I thought I would make the tools of calculation this week's Wooly Words.
Grist: The thickness or weight of a yarn, usually expressed in yards per pound or meters per kilo.
WPI: wraps per inch. This is a simple, inexpensive method of calculating the thickness of a yarn for a handspinner. The measurement is how many yarn diameters add up to one inch. You wrap yarn around a ruler or other tool for one inch and count how many wraps it took to fill that space. Really bulky yarn might be only 6 to 8 wraps per inch, while a gossamer thread might be 80 wraps per inch.
Niddy-noddy: A tool that allows for measurement of the yardage in a skein while forming the skein. The most common skein diameters created on a noddy is 1, 1.5 or 2 yards, but there are miniature versions as well. The length of the yarn is wound around the four ends of the niddy noddy. The number of times it has been wound multiplied by the length of the niddy noddy equals the total length of yarn in the skein. Here is a picture of an Ashford niddy noddy that has yarn wound on it:

Tuesday, February 14, 2012
WIP Eradication Campaign
My Webster's New World Dictionary defines "eradicate" as to uproot, stamp out, or destroy. This sums up my attitude towards my pile of WIPs (works-in-progress, see the glossary) quite well. I readily acknowledge and accept that having multiple WIPs at any given time is part of the creative process. However, my current WIPs feel less like a creative process and more like a mountain of unfocused, unfinished work that are taking up too much of my limited storage space. And that means both physical storage space and mental storage space. I've learned that my brain has a limit on how many ongoing projects I can mentally accommodate at a time... and I've reached that boundary.
So it's time to eradicate my WIPs, or at least enough of them that I don't feel overwhelmed by this mountain of unfinished work. Out with the old to make room for the new! This mountain has been built from many different kinds of WIPs - spinning, knitting, crochet, even one small weaving project. I've been debating with myself how much I consider fiber prep to be a WIP. It's tricky, because there are many stages of fiber prep between raw fleece and finished yarn. Once I start washing a fleece, it feels like I have a WIP until all the fiber is clean, dry, and stored. Now it's no longer a WIP. Once I start picking it, then carding or combing, suddenly it's a WIP again until I've finished the prep that I started. Then it can sit as fiber ready to spin, but until I start spinning it, it's not really a WIP taking up some of that precious mental space I mentioned. So perhaps it's just the particular way my brain organizes project information, but raw fleece sitting in a bag on a shelf doesn't bother me. But a washed fleece that is maybe half done with picking for carding is like a splinter in my brain, constantly nagging me to finish it.
There is a shamed, judgemental part of me that wants to lay down the law, demanding that all WIPs are finished before I can start any new projects. However, the happy and realistic side of me doesn't have any patience for that kind of puritanical nonsense. So I know that it will take me the rest of this year to reduce my WIP mountain to rubble, but as long as I intersperse new projects with finishing old projects, I'll eventually reach my destination.
In any case, I'm starting my WIP eradication campaign with my spinning WIPs. I consider a spinning project finished with the yarn is completed (however I have designed it - singles or plied, washed, hung to dry, etc.), including the calculation of the final statisitics of the skein. I have some easy spinning WIPs where the yarn is finished and all that remains to removing it from the WIP list is calculating the skein stats. Other spinning WIPs are more extensive, where I've only started the singles, or the singles are complete and need to be plied. Right now I have about six spinning WIPs. Here is the list and the status of each WIP:
1. BFL multicolored yarn / calculate skein stats
2. Easter 2011 yarn / calculate skein stats
3. "English Garden" sample yarn / finish plying
4. Indiana Dunes yarn / start plying
5. Black & white mill ends yarn / finish spinning singles
6. Spinning inventory: this is a biggie. I am a member of Ravelry and I love their stash organizational tool. And the truth is, I don't know exactly what I have in my stash right now. I belonged to a fiber club for months (from my favorite dyer, woolgatherings), and I accumulated lots of handpainted tops that I never recorded in my inventory list. I need to take pictures of the tops and record them into my stash inventory, writing down the kind of fibers, etc. I have lots of natural fibers, too, that need to be recorded. I want to be able to call up my inventory list and see exactly what I have at any given time in my stash. It will make project planning so much easier!
Let's eradicate one WIP right now. I'll calculate the skein stats for the multilcolored BFL yarn that I spun last April during a family visit to Indiana. I left the handpainted top in one piece and spun it on to a single bobbin on my wheel. Then I n-plied it to create the final 3-ply yarn, finished it by setting the twist in a hot water wash and letting the yarn dry. Now I simply need to calculate the weight, thickness, and length of the yarn and it'll be removed from the WIP list.
So here it is:
100% BFL wool
3-ply semiworsted
4.1 ounces, 9-11 WPI (worsted to bulky thickness), 102 yards


Monday, February 13, 2012
Blog Resurrection
It makes me both sad and a little crazy that I haven't kept up with this blog. I think about it, I create posts in my head, and I let it drift away from me. Well, enough of that behavior. This blog is now officially resurrected and I will not let it dwindle again.
So what's been up in zeithound's fiber life for the past several months? Sadly, not much, due in large part to elbow and wrist injuries, or at least to the tendon that connects them. I did manage to knit three pairs of socks for Christmas gifts. But the fiber prep and spinning work suffered from my arm & wrist pain. I didn't use my wheel or any spindles for almost 6 months, and I didn't work on any of my fleece prep during that time either. The handknitted gifts weren't a good idea for healing the injuries, but I was too stubborn not to have at least a few handmade gifts for family & friends at Christmas.
And I have another confession. My studio was such a complete disaster area that it wasn't exactly conducive to productivity. The room had degenerated into the lily pad approach - you know, where manueverability was reduced to jumping from clean spot to clean spot? Not good. Cringe-worthy, in fact.
But these problems are on the mend now. My arm & wrist are much improved (physical therapists are wonderful people!), and you can actually see the floor and the top of my desk in my studio. The shelves are organized. Mostly. The shoveling out of my studio clean-up is still in process, but the space is useable again. I'm lucky (and grateful to the Fates) that I have a room of my own for my work, so I'm very annoyed with myself that I didn't take better care of it. But I will not continue to moan over it, I will just make sure that I keep it useable & orderly in the future.
For the past few weeks, now that I have space, access to my tools, and a functioning arm, I've been on a bit of a spinning bender. It's like I found a missing piece of myself. I've had several "Oh yeah, I remember now, this fiber work makes me incredibly happy" moments. I've managed to complete two new yarns from start to finish, as well as finishing one longstanding WIP. It feels damn good to have fiber in my hands again, and it feels even better to have finished some work.
So here are the three yarns I've made since reviving my spinning craft, listed in the order in which I finished them:
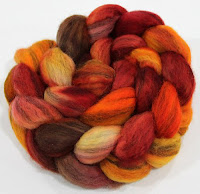
1. Red/autumn colored yarn:
Process: Spindle-spun from handpainted BFL top. Left the top in rope form, drafted with a medium draw where twist was allowed into the drafting zone. Plied on my wheel. Finished in hot water with a bit of soap, agitated it a bit, shocked it back & forth with hot and cold water once, thwapped it against my wrists & hung to dry.
Vital stats:
100% BFL wool
3-ply semiworsted yarn
3.8 ounces, 13-15 WPI, 202 yards


2. Polwarth blues yarn:
Process: I had started spinning this yarn about a year ago using a spindle, and then the singles sat on storage bobbins for months and months. I finally sat down at the wheel and plied the singles together, creating my first ever 4-ply yarn. Finished in my usual way with hot water, a bit of soap, not much agitation in this case, thwapping a few times, and then hung to dry. The final yarn is really smooth and has a surprising amount of elasticity for a worsted yarn. And I'm a bit smug with myself to have created such a thin 4-ply yarn by hand, which I hope will eventually make a lovely pair of socks.
Vital stats:
100% Polwarth wool
4-ply worsted yarn
3.9 ounces, 18 WPI, 312 yards


3. Happily Ever After yarn:
Process: This yarn is named for the February 2012 challenge from the Spindler's group on Ravelry. I wanted to design a yarn that was soft and bouncy using this blend of merino-angora fiber. I created faux rolags out of the handpainted top, then used a woolen drafting style to create the singles. After plying the singles, I finished the yarn fairly harshly in order to encourage a bit of fulling as well as a soft angora halo. The final yarn is really pretty with all of the character I wanted it to have, with a gorgeous softness & halo and lots of bouncy elasticity.
Vital stats:
80% merino, 20% angora blend
2-ply semiwoolen yarn
1.3 ounces, 20 WPI, 170 yards


So what's been up in zeithound's fiber life for the past several months? Sadly, not much, due in large part to elbow and wrist injuries, or at least to the tendon that connects them. I did manage to knit three pairs of socks for Christmas gifts. But the fiber prep and spinning work suffered from my arm & wrist pain. I didn't use my wheel or any spindles for almost 6 months, and I didn't work on any of my fleece prep during that time either. The handknitted gifts weren't a good idea for healing the injuries, but I was too stubborn not to have at least a few handmade gifts for family & friends at Christmas.
And I have another confession. My studio was such a complete disaster area that it wasn't exactly conducive to productivity. The room had degenerated into the lily pad approach - you know, where manueverability was reduced to jumping from clean spot to clean spot? Not good. Cringe-worthy, in fact.
But these problems are on the mend now. My arm & wrist are much improved (physical therapists are wonderful people!), and you can actually see the floor and the top of my desk in my studio. The shelves are organized. Mostly. The shoveling out of my studio clean-up is still in process, but the space is useable again. I'm lucky (and grateful to the Fates) that I have a room of my own for my work, so I'm very annoyed with myself that I didn't take better care of it. But I will not continue to moan over it, I will just make sure that I keep it useable & orderly in the future.
For the past few weeks, now that I have space, access to my tools, and a functioning arm, I've been on a bit of a spinning bender. It's like I found a missing piece of myself. I've had several "Oh yeah, I remember now, this fiber work makes me incredibly happy" moments. I've managed to complete two new yarns from start to finish, as well as finishing one longstanding WIP. It feels damn good to have fiber in my hands again, and it feels even better to have finished some work.
So here are the three yarns I've made since reviving my spinning craft, listed in the order in which I finished them:
1. Red/autumn colored yarn:
Process: Spindle-spun from handpainted BFL top. Left the top in rope form, drafted with a medium draw where twist was allowed into the drafting zone. Plied on my wheel. Finished in hot water with a bit of soap, agitated it a bit, shocked it back & forth with hot and cold water once, thwapped it against my wrists & hung to dry.
Vital stats:
100% BFL wool
3-ply semiworsted yarn
3.8 ounces, 13-15 WPI, 202 yards


Process: I had started spinning this yarn about a year ago using a spindle, and then the singles sat on storage bobbins for months and months. I finally sat down at the wheel and plied the singles together, creating my first ever 4-ply yarn. Finished in my usual way with hot water, a bit of soap, not much agitation in this case, thwapping a few times, and then hung to dry. The final yarn is really smooth and has a surprising amount of elasticity for a worsted yarn. And I'm a bit smug with myself to have created such a thin 4-ply yarn by hand, which I hope will eventually make a lovely pair of socks.
Vital stats:
100% Polwarth wool
4-ply worsted yarn
3.9 ounces, 18 WPI, 312 yards


Process: This yarn is named for the February 2012 challenge from the Spindler's group on Ravelry. I wanted to design a yarn that was soft and bouncy using this blend of merino-angora fiber. I created faux rolags out of the handpainted top, then used a woolen drafting style to create the singles. After plying the singles, I finished the yarn fairly harshly in order to encourage a bit of fulling as well as a soft angora halo. The final yarn is really pretty with all of the character I wanted it to have, with a gorgeous softness & halo and lots of bouncy elasticity.
Vital stats:
80% merino, 20% angora blend
2-ply semiwoolen yarn
1.3 ounces, 20 WPI, 170 yards


Subscribe to:
Posts (Atom)